Fantôme Kino B&W ISO 8
Fantôme Kino B&W Film is perfect for pinhole, striking portraits and gritty street scene snaps. With low ISO and a small exposure latitude, this impactful black and white film navigates inter-tonal shifts with ease resulting in rich, low grain depictions with vibrant microcontrast. The Fantôme Kino B&W Film can bring scenes to life, capturing life’s most evocative moments in show stopping low iso black and white splendor.
A Director’s Dream
This panchromatic is perfect for seasoned professionals and creative first time photographers alike. It’s particularly appropriate for those who like to take full manual control and experiment with flash photography. The Fantôme Kino B&W Film packs drama into the frame with crushed shadows and super high contrast renderings, reminiscent of our favorite Film Noir classics. But ya gotta like it. (is it your cup of tea?)
Master your Low ISO Film
This film has a slow speed of ISO 8, so using a camera and lens with manual controls will give you better control over your exposures. If you’re in the Program “spray and shoot” crowd,…I’d say skip this one. You should be able to manually adjust the shutter speed of your camera and aperture of your lens. Using a fast lens (maximum aperture of at least f/1.4 – f/2.8), is also recommended. Well, sorta. Of course strobes, flash and very bright sunlight will make a difference. Look at the charts. (or your iPhone apps)
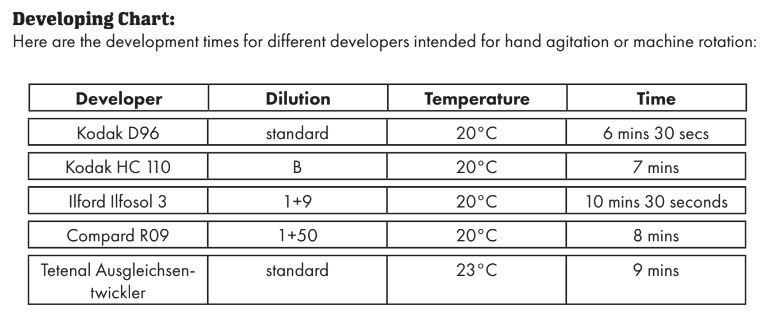
This evocative emulsion can be developed both in the lab or at home with the standard black and white process. (I advise home myself,…latitude will inherently be reduced) Here is a quick overview on how your developer of choice will work with the Fantôme Kino film:
D-96
This is Lomo’s recommended developer for Fantôme Kino. Preserving the details in the highlights, but still maintaining the film’s signature contrast look.
Kodak HC-110
Kodak HC-110 is one of their favorite developers for developing monochrome film. (actually, I like it too) The Fantôme Kino developed in HC-110 would result in punchy dramatic contrast that makes images “pop”. How much extra contrast you need is questionable.
Ilford Ilfosol 3
This developer produces fine grain and rendering good contrast and impressive shadow detail. Ilfosol is a viable option if you’re looking to give your shots a softer and moodier atmosphere. However,…it’s 8 ISO/ASA!!! How much finer grain do you want? (or will even be able to perceive?)
Compard R09
A good Rodinal substitute, this developer ensures really fine grain preserving much detail and sharpness. This one is for the photographer who has a keen eye and an appreciation for the small things. I’ve used Rodinal,…but not Compard. If you’re a rebel,…go for it.
Tetenal Ausgleichsentwickler
This developer provides a balanced amount of contrast and is suitable for available light, reportage, and even fine art photography. I was never a fan, but also I’ve never tried on this very low ISO film. Probably worth a try just to get to say a German word. (other than ‘scheisse’)
1. Use These Simple Tips
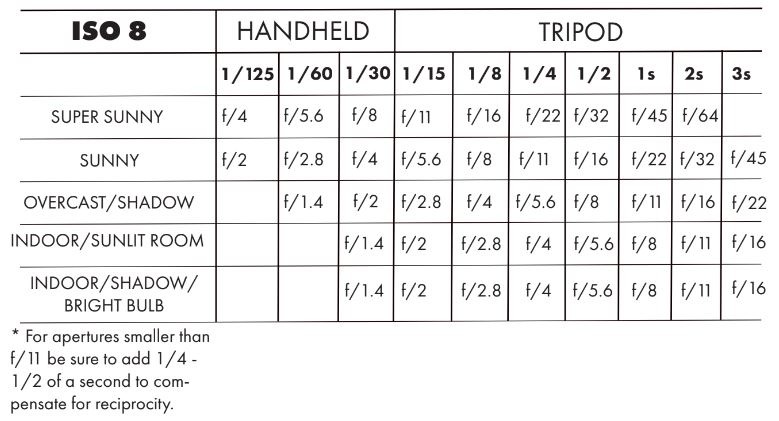
You just have to pay close attention to how bright the situation is before taking a photo. First you should determine what the largest aperture and shutter speed available on your camera/lens is. Then consult the exposure chart below to see which situation would work best with your camera’s settings.
2. For Better Control, Use a Camera With Manual Controls
This film has a slow speed of ISO 8, so I’d recommend using a camera+lens with manual controls for better control over your exposures. You should be able to manually adjust the shutter speed of your camera and aperture of your lens. Using a fast lens (maximum aperture of at least f/1.4 – f/2.8), is also recommended by Lomo. (we get exposure measurement, Lomo) 🙄
3. Use a Flash!
Is the scene a bit too dark? Use a flash, even outdoors! Having a flash ready to fill in the shadows during the day could also create a unique effect. Well, I would heartily agree. At 8 ISO, light is your friend. (and LOTS of it)
4. When in Doubt, Use an External Light Meter
To ensure accurate exposure times, we recommend using an external light meter to determine the correct exposure values. I’ve retired my Minolta some time ago, but the smartphone app, ‘Pocket Light Meter’ works just fine. And allows for reciprocity calculations
5. Have a Film Lab Develop Your Film
If you send your film out, and it explodes your developers head, the development chart has a list of developers and developing times. I doubt your local lab is familiar with this film. So just provide them with a little chart print out, or they can contact Lomography at: help@lomography.com However, hand developing is best. Especially for achieving your own creative vision.
I could see some really interesting work from the tripod crowd. (stuff that doesn’t move) Landscape, still life’s, (flowers, etc.) Even some very interesting captures of movement. Personally, I wouldn’t limit myself to wide apertures. But, hey, that’s me.
Exposure Chart
At $7.12 for a 36 exposure roll, (Tri-X is $6.49), that’s about right for an “exotic” film. Certainly not overpriced. Order From Lomography HERE


I have a few 35mm film cameras. However, none of them can be set below ISO 12. It seems to be I would have to underexpose ISO 8 film and push process the negatives.
Hi Khurt,
The lowest ISO is simply what setting the manufacturer has chosen to enable or mark, (digital LCD readout or physical markings), on that model, whether digital or film. However, it’s pretty easy to calculate lighting for any ISO. (while shooting) Making push processing not necessary. (unless you want to for some other creative process) Although “8 ISO” would require a LOT of light to expose properly with normal development. In fact, that has given me a good idea for an article. People always seem to love those little technical essays and graphs. ( like https://www.anatomyfilms.com/medium-format-lens-vs-35mm-lens/ )
Thanks
AF